1.自动装配原理再理解
1.1 自动装配要点
SpringBoot启动会加载大量的自动配置类
看需要的功能有没有在SpringBoot默认写好的自动配置类中
再来看这个自动配置类中到底配置了哪些组件(只要我们要用的组件存在在其中,我们就不需要再手动配置了)
给容器中自动配置类添加组件的时候,会从properties类中获取某些属性。我们只需要在配置文件中指定这些属性的值即可
xxxxAutoConfigurartion:自动配置类;给容器中添加组件;
xxxxProperties:封装配置文件中相关属性。
1.2 了解@Conditional
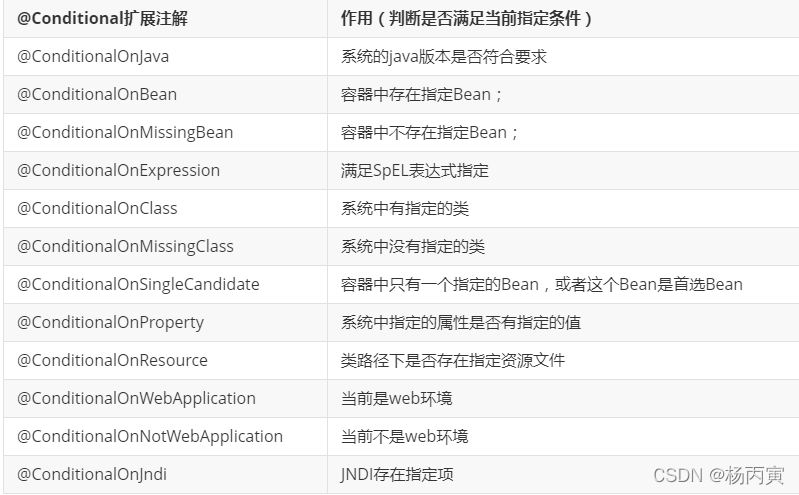
自动配置类必须在一定的条件下才能生效,必须是@Conditional指定的条件成立,才给容器中添加组件,配置里面的所有内容才生效
@Conditional派生注解(Spring注解版原生的@Conditional作用)

可以通过启用 debug=true属性;来让控制台打印自动配置报告,这样就可以很方便的知道哪些自动配置类生效
- Positive matches:(自动配置类启用的:正匹配)
- Negative matches:(没有启动,没有匹配成功的自动配置类:负匹配)
- Unconditional classes: (没有条件的类)
2. 自定义starter
启动器模块是一个空jar文件,仅提供辅助性依赖管理,这些依赖可能用于自动装配或者其他类库。启动器包了一层自动配置类,自动配置类作用就是写@Bean注解,往容器里面配置Bean,然后Bean所需要的属性都来源于配置文件所映射的属性配置类
2.1 命名约束
- 官方命名:
前缀: spring-boot-starter-xxx
比如:spring-boot-starter-web…
- 自定义命名:
xxx-spring-boot-starter
比如:mybatis-spring-boot-starter
2.2 编写启动器
需要建立的项目模块
- 一个springboot空项目:diy
- 一个maven模块:starter
- 一个springboot模块:starter-autoconfigure
- 一个测试springboot模块:test
在 starter 中导入 starter-autoconfigure 的依赖,starter无需编写什么代码,只需让该工程引入starter-autoconfigure依赖(即maven模块中引入springboot模块):
1
2
3
4
5
6
<!--引入自动配置包-->
<dependency>
<groupId>com.cc</groupId>
<artifactId>starter-autoconfigure</artifactId>
<version>0.0.1-SNAPSHOT</version>
</dependency>starter-autoconfigure项目下:
Pom中只留下一个 starter,这是所有的启动器基本配置
编写HelloProperties配置类:
1
2
3
4
5
6
7
8
9
10
11
12
13
14
15
16
17
18
19
20
21
22
public class HelloProperties {
private String prefix;
private String suffix;
public String getPrefix() {
return prefix;
}
public void setPrefix(String prefix) {
this.prefix = prefix;
}
public String getSuffix() {
return suffix;
}
public void setSuffix(String suffix) {
this.suffix = suffix;
}
}编写一个个人服务HelloService:
1
2
3
4
5
6
7
8
9
10
11
12
13
14
15
public class HelloService {
HelloProperties helloProperties;
public HelloProperties getHelloProperties(){
return helloProperties;
}
public void setHelloProperties(HelloProperties helloProperties){
this.helloProperties=helloProperties;
}
public String sayHello(String name){
return helloProperties.getPrefix()+name+helloProperties.getSuffix();
}
}编写自动配置HelloServiceAutoConfiguration 类并注入Bean:
1
2
3
4
5
6
7
8
9
10
11
12
13
14
15
16
17
18
19
20
21
22
23
24
25
/**
* 自动配制类
*/
/**
* EnableConfigurationProperties的作用
* 1、开启HelloProperties配置绑定功能
* 2、把这个HelloProperties这个组件自动注册到容器中
*/
//web应用生效
public class HelloServiceAutoConfiguration {
HelloProperties helloProperties;
// @Bean 用在方法上,告诉Spring容器,你可以从下面这个方法中拿到一个Bean
public HelloService helloService(){
HelloService service = new HelloService();
service.setHelloProperties(helloProperties);
return service;
}
}在resources编写一个自己的 META-INF\spring.factories
1
2
# Auto Configure
org.springframework.boot.autoconfigure.EnableAutoConfiguration=\com.cc.HelloServiceAutoConfiguration安装到maven库

测试项目test下:
导入我们自己写的启动器
1
2
3
4
5<dependency>
<groupId>com.cc</groupId>
<artifactId>starter-autoconfigure</artifactId>
<version>0.0.1-SNAPSHOT</version>
</dependency>编写一个 HelloController 进行测试自己的写的接口
1
2
3
4
5
6
7
8
9
10
public class HelloController {
HelloService helloService;
public String hello(){
return helloService.sayHello("whh");
}
}编写配置文件 application.properties
1
2
cc.hello.prefix="qqqqqq"
cc.hello.suffix="pppppp"启动项目测试

3. 软件报错问题
3.1 连接不到spring网站,下载不了压缩包


- 解决办法:联想电脑管家的问题,把电脑管家退出之后就可以了
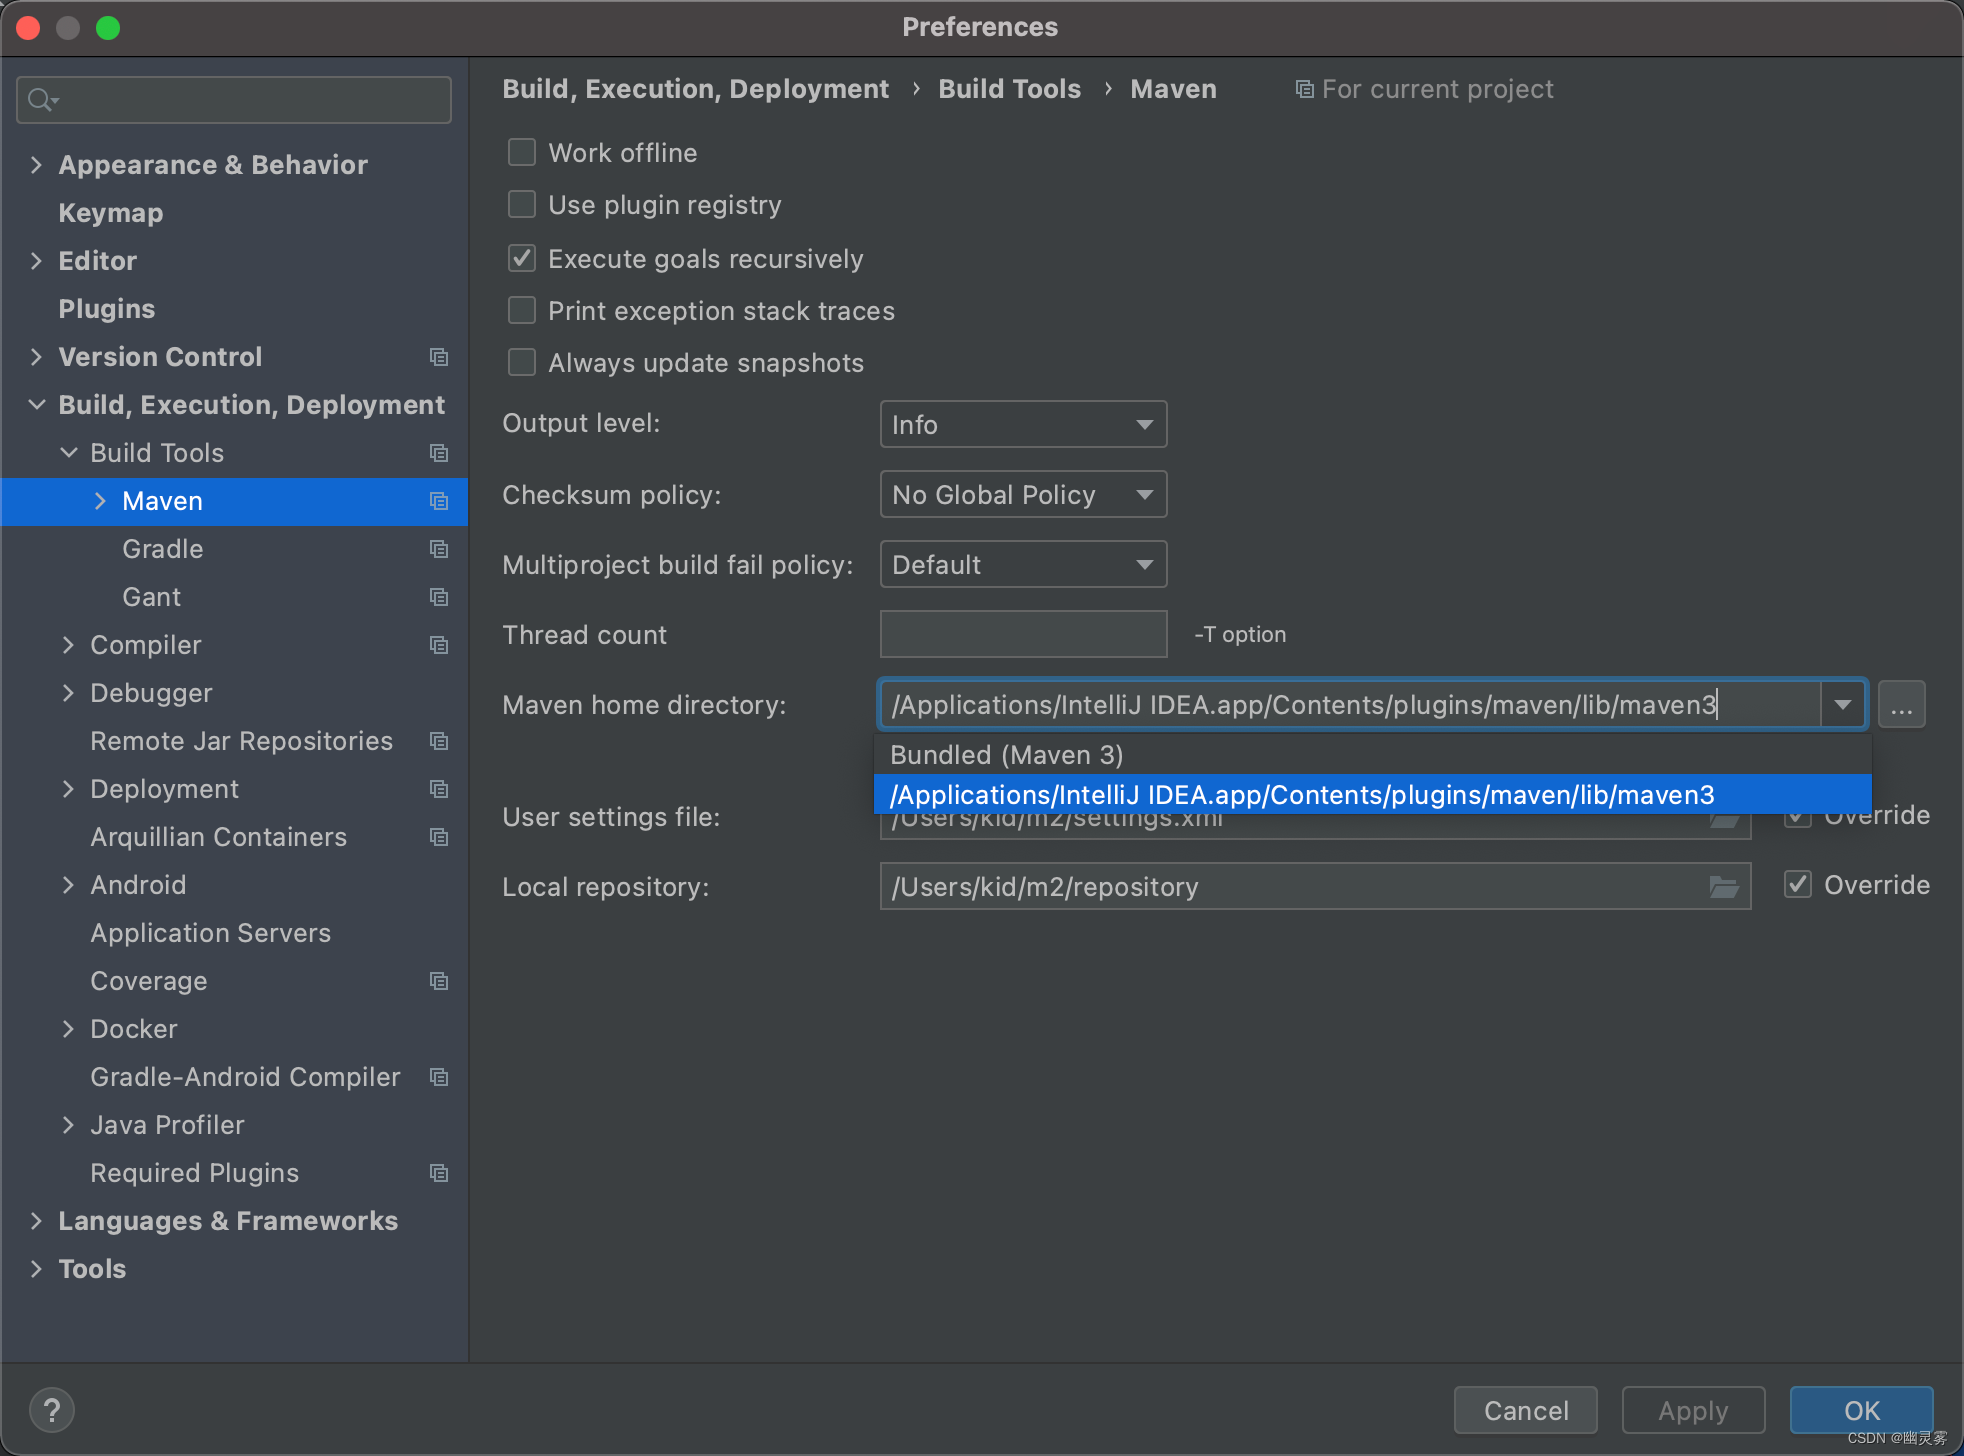
3.2 maven与IDEA版本不匹配

- 解决办法:在IDEA中打开“Preferences”,找到“Maven”菜单,在“Maven home directory”中,选择IDEA自带的Maven3(自带Maven的版本肯定是兼容的)

